
For beginners venturing into the world of fly tying, the question of where to start can be overwhelming. With so many intricate patterns and techniques out there, it’s understandable to feel a bit lost. Luckily, there is one fly that stands out as the perfect starting point for aspiring fly tyers: the Woolly Bugger. Known for its simplicity and effectiveness, this versatile pattern is often hailed as the easiest fly to tie. In this article, we will explore why the Woolly Bugger is a fantastic choice for beginners, and how it can serve as a stepping stone into the captivating art of fly tying. So grab your vise and let’s get started!
Materials Needed
Before we dive into the specifics of the easiest fly to tie, let’s go over the basic materials you’ll need for any fly tying project:
- Thread: Choose a strong, durable thread in a color that matches your desired fly pattern.
- Hook: Select a hook size and style appropriate for the type of fly you want to tie.
- Feathers or fur: These materials will provide the texture and movement to your fly.
- Scissors: A good pair of sharp scissors is essential for trimming materials.
- Hackles: Hackles are used to create a collar or legs on certain fly patterns.
- Beads or weighted wire: These materials can add weight to your fly and help it sink in the water.
Basic Fly Tying Techniques
Before we delve into the easiest fly pattern, let’s familiarize ourselves with some basic fly tying techniques. These techniques are the building blocks of fly tying, and mastering them will set you up for success in all your future projects. Here are a few techniques to get you started:
- Wrapping: This technique involves wrapping materials, such as thread or hackles, around the hook to create the body of the fly.
- Whip Finishing: Whip finishing is a method used to secure the thread and finish off the fly.
- Dubbing: Dubbing is the process of creating a fuzzy body on a fly using various materials, such as fur or synthetic dubbing.
- Palmering: Palmering is a technique where a hackle feather is wrapped around the hook, creating a fuzzy appearance.
- Ribbing: Ribbing involves wrapping a thin material, such as wire or tinsel, around the body of the fly to provide structure and durability.
- Stacking: Stacking is a technique used to align and tame the fibers of materials, such as hair or feathers, before tying them onto the hook.
- Winging: This technique is used to attach wings to a fly, using feathers or synthetic materials.
Understanding Fly Categories
Now that you have a better understanding of the basic techniques, it’s important to familiarize yourself with the different categories of flies. Each category serves a specific purpose and imitates a particular type of aquatic insect. Here are the main categories of flies:
- Dry Flies: These flies are designed to float on the surface of the water and imitate adult insects.
- Wet Flies: Wet flies are meant to be submerged below the surface and represent insects in their nymphal or emergent stages.
- Nymphs: Nymphs imitate the immature form of aquatic insects, which live underwater.
- Streamers: Streamers are large flies that imitate baitfish or other large aquatic creatures, meant to be fished aggressively.
- Saltwater Flies: Saltwater flies are specifically designed for fishing in saltwater environments and imitate various marine species.
Choosing the Right Fly for Beginners
When starting out, it’s important to choose a fly that is well-suited for beginners. Here are some factors to consider when selecting the right fly for you:
- General Characteristics: Look for flies with simple patterns and a limited number of materials. This will make the tying process more manageable.
- Common Patterns: Opt for flies with proven effectiveness and widely used patterns. These patterns often have detailed instructions and tutorials available, making it easier for beginners to learn.
- Versatility: Choose a fly pattern that can be used in a variety of fishing situations. This will allow you to practice tying and fishing with the same fly.
- Ease of Tying: Select a fly that doesn’t require complex techniques or hard-to-find materials. This will minimize frustration and help build your confidence as a beginner tyer.
- Effectiveness: Look for flies that are known to catch fish. This will motivate you to continue tying and improve your skills.
- Availability: Ensure that the materials required for the fly pattern are readily available at your local fly shop or online.

Recommended Easiest Fly to Tie – Woolly Bugger
After considering the factors above, the easiest fly for beginners to tie is the Woolly Bugger. The Woolly Bugger is a versatile fly that imitates a variety of aquatic creatures, making it effective in both freshwater and saltwater environments. Let’s take a closer look at this beginner-friendly fly:
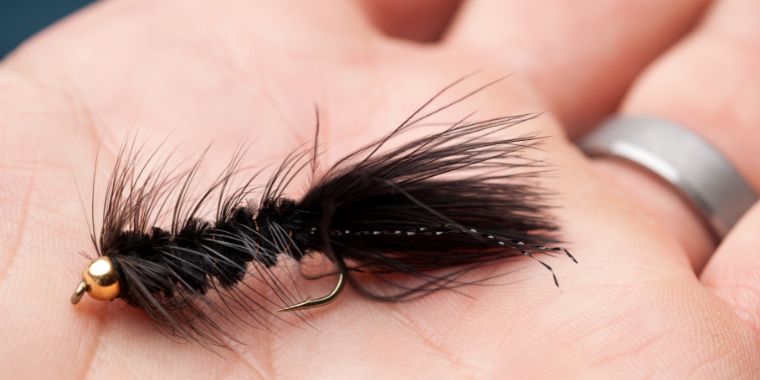
- Overview: The Woolly Bugger is a streamer fly that represents a leech, minnow, or other small baitfish. It features a marabou or bunny strip tail, a body made of chenille or dubbed material, and some form of hackle or palmering.
- Materials: To tie a Woolly Bugger, you’ll need a hook, thread, marabou or bunny strip, chenille or dubbing material, hackle, and bead or weighted wire.
Step-by-step Instructions: Here’s a simplified version of the steps involved in tying a Woolly Bugger:
- Secure the Hook: Place the hook in the vise and make sure it’s held securely.
- Attach the Thread: Start the thread near the eye of the hook and wrap it back towards the bend of the hook. This will provide a base for the materials.
- Tying in the Tail: Select a marabou or bunny strip and tie it in at the bend of the hook, making sure it extends about the length of the hook shank.
- Wrapping the Body: Wrap the chenille or dubbing material around the hook shank, creating a thick body. Secure it with the thread.
- Adding Hackle Feather: Select a hackle feather and tie it in at the base of the body. Palmer the feather forward, wrapping it around the hook to create a full-bodied appearance.
- Tying Off and Trimming Excess: Once you reach the eye of the hook with the hackle feather, tie it off and trim any excess material.
- Finishing Touches: Whip finish the fly by making several wraps of thread behind the eye of the hook, then cut the thread and add a drop of head cement to secure the thread.
- Variations and Modifications: The Woolly Bugger is a versatile pattern that can be tied in various sizes and colors. You can experiment with different chenille materials, hackle colors, or even incorporate beads or weighted wire to add additional weight.
Tips and Tricks for Beginners
As a beginner fly tyer, it’s important to have some tips and tricks up your sleeve. Here are a few tips to help you on your fly tying journey:
- Start with Larger Hooks: Working with larger hooks can be easier for beginners, as they provide more room to work with and are less likely to break.
- Take Your Time: Fly tying is a craft that requires patience and attention to detail. Take your time with each step and don’t rush the process.
- Practice Proper Thread Tension: Maintaining proper tension on the thread is crucial for secure and neat wraps. Practice applying just the right amount of pressure to achieve consistent tension.
- Use Quality Materials: Investing in good quality materials will make your tying experience more enjoyable and ultimately result in better-looking flies.
- Watch Tying Videos: Don’t be afraid to learn from others! Watching online tutorials and videos can provide valuable insights and techniques.
- Join a Fly Tying Community: Surrounding yourself with fellow fly tyers can be a great way to learn and share tips and tricks. Join local clubs or online forums to connect with other enthusiasts.
Common Mistakes and How to Avoid Them
Fly tying is a learning process, and beginners often make mistakes along the way. Here are a few common mistakes and how to avoid them:
- Using Too Much Material: Less is often more when it comes to fly tying. Avoid overcrowding the hook with excessive materials, as this can affect the fly’s appearance and performance.
- Not Securing Materials Properly: Make sure to secure each material firmly and trim away any excess. Loose materials can unravel or interfere with the fly’s action.
- Incorrect Proportions: Pay attention to the proportions of your fly. Try to match the length and thickness of materials to the natural insects or baitfish you’re imitating.
- Inadequate Thread Control: Keep consistent tension on the thread and use proper thread wrapping techniques to secure materials tightly. Loose wraps can cause materials to shift or unravel.
- Skipping Steps: Follow the tying instructions step-by-step. Skipping steps or rushing through the process can lead to an unbalanced or poorly constructed fly.
- Lack of Patience: Fly tying takes time and practice. Don’t expect perfect results right away. Embrace the learning process and be patient with yourself.
Fly Tying Tools for Beginners
While you can start with the basic materials mentioned earlier, having a few essential tools can greatly enhance your fly tying experience. Here are some tools that beginners should consider:
- Half-Hitch Tool: This tool is used to create a half-hitch knot, which secures the thread and prevents it from unraveling.
- Bobbins: Bobbins are used to hold the thread and facilitate easy thread management while tying.
- Hackle Pliers: Hackle pliers provide a firm grip on delicate materials like hackle feathers, making them easier to manipulate.
- Dubbing Whirl: A dubbing whirl helps you spin dubbing material onto the thread, creating a tightly wound body.
- Hackle Gauge: A hackle gauge allows you to measure and select the appropriate size hackle for your fly pattern.
Additional Easy Flies for Beginners
Once you’ve mastered the Woolly Bugger, there are several other easy fly patterns that you can try. Here are a few additional flies for beginners:
- Elk Hair Caddis: The Elk Hair Caddis is a versatile dry fly pattern that imitates adult caddisflies. It requires basic tying skills and is highly effective in a variety of fishing situations.
- Pheasant Tail Nymph: The Pheasant Tail Nymph is a classic nymph pattern that imitates mayfly nymphs. It can be tied in various sizes and is a great pattern for trout fishing.
- Griffith’s Gnat: The Griffith’s Gnat is a simple and effective midge pattern that imitates tiny insects floating on the water’s surface.
- Adams Parachute: The Adams Parachute is a popular dry fly pattern that imitates a wide range of mayflies. It’s easy to tie and can fool even the pickiest of trout.
- Woolly Worm: The Woolly Worm is a variation of the Woolly Bugger and is an excellent option for beginners looking to experiment with different color combinations.
With these easy fly patterns, you’ll have a diverse selection of flies to use on the water and plenty of opportunities to practice and develop your fly tying skills.
In conclusion, the easiest fly to tie for beginners is the Woolly Bugger. With its simple pattern and versatile nature, it’s a great fly to start your fly tying journey. As you gain more experience and confidence, you can explore other patterns and techniques. Remember to take your time, practice patience, and enjoy the process of creating your own flies. Happy tying!

Subscribe to get our FREE ebook
The Ultimate Fly Fishing Starter Guide
and receive fly fishing tips and tricks to help you catch more!
